STEP 1 - Subscribe
Select your HomeScouting Adventure Club subscription. Choose a monthly payment option or subscribe for a year to save! NOTE: Your payment will begin in September for the HomeScouting Adventure club in exactly how many days the "free trial" states is left.
STEP 1 - Subscribe
Select your HomeScouting Adventure Club subscription. Choose a monthly payment option or subscribe for a year to save! NOTE: Your payment will begin in September for the HomeScouting Adventure club in exactly how many days the "free trial" states is left.


THE TRAIL
WELCOME TO THE TRAIL
Welcome to The Trail! Each month of the HomeScouting Adventure Club for Scouts BSA will be focused on a merit badge. Below you can complete all of the requirements for Traffic Safety merit badge. Scouts are encouraged to find a local merit badge counselor to fully complete the merit badge. The HomeScouting Adventure Club will provide a limited number of merit badge counselors to have small group merit badge sessions.
When you're ready, get started on your HomeScouting Adventure!
Looking for last month's merit badge? Click the Link Below!
Need a Merit Badge Counselor?
Make sure to download the connected worksheet for this month's adventure!
JANUARY ADVENTURE:
ART


WHAT IS ART?
The question of what "art" is has occupied the minds of philosophers and critics ever since
humankind began to think and argue. The term has been applied to many forms of visual
media, especially to the fine arts-drawing, painting, sculpture, and printmaking. But it also
includes architecture, industrial design, fashion design, pottery, and weaving. The difference
is that fine arts are concerned only with beauty and expression and the others--though the
art may be beautiful-focus first on function.
This merit badge concentrates on two-dimensional art, specifically drawing and painting
in various media. One requirement introduces you to design applications in the fields of
graphic arts and industrial design. After you learn about art history and design principles, you will understand how these fields relate to fine art.
ART AS REALITY
Since prehistoric people first made cave paintings, artists have tried to portray reality. But what is reality? That depends. The Egyptians portrayed their kings and queens as gods; they posed them in rigid and formal positions in keeping with a god's awe-inspiring majesty. The ancient Greeks, on the other hand, portrayed their gods and rulers as people.
Classical Greek and Roman artists idealized the human figure as having a noble
character and cause. This style of art was widely displayed in public places to give
the people the impression-true or not-that their leaders were exceptional.
With the founding and growth of Christianity, religious expression became a
popular form of public art. Popes and rich merchants employed artists such as
Giotto, Raphael, and Michelangelo to create art to decorate churches and family
altars. In the sixteenth and seventeenth centuries, when the building of huge
churches declined, the demand for privately owned art increased. People in the
growing middle class wanted secular (worldly) art to hang in their homes,
particularly landscapes, por- traits, and still lifes.
ROOTS OF MODERN ART
In the seventeenth and eighteenth centuries, many governments changed
drastically, as did the way people earned their living. Artists responded to these changes in basically two ways.
One group of artists, led by Jacques-Louis David, looked to the past, to classical Greek and Roman times when a religious or ruling class held all authority. This movement was called neoclassicism, or "new classic." It was a more formal style that focused on the noble character of man, much like Greek and Roman art.
In the other camp were artists who wanted to move away from what the public
expected and paint from their own subjective viewpoint. The movement, called
romanticism, emphasized feelings and imagination rather than reason. This style
was the beginning of personal artistic expression.
In 1849, Gustave Courbet, a French artist, reacted against the romantics, accusing
them of trying to "escape from the reali- ties of the times." He also criticized the
idealized art of the neo- classicists. Courbet chose his subjects from everyday life
and painted them exactly as they were. He was part of the move- ment called
realism.
Édouard Manet, another French artist, continued the rebellious trend of using
commonplace subjects. He rejected conventional ways of painting, emphasizing
the two-dimensional character of the picture surface. He applied paint heavily,
allowing the brush strokes to become part of the texture. Manet claimed that a paint- ing was not just a representation of another object, but a worthy object in its own right.
The impressionists, represented by Claude Monet, Auguste Renoir, and Edgar Degas, extended Manet's ideas. They explored the effects of light and color, treating them with as much importance as the subject of their paintings. Paul Cézanne experimented with shape and structure by reducing objects to geometric forms. He thought all objects in nature were based on the cone, sphere, and cylinder.


Sculpture of Zeus, the ancient Greeks' supreme god

Jacques-Louis David's "Madame Recamier" (1800)


Vincent Van Gogh's paintings expressed intense emotions through violent color combinations and vigorous brushwork. His work influenced expressionism, the movement that depicted inner experience by distorting images in the natural world.
In less than 50 years-from Manet to Van Gogh-artists had gained recognition for their new ideas about art. They were no longer bound by tradition or what the public expected. Artists had freed themselves to explore the elements of art within the context of the painting.
ART IN A MODERN LIGHT
Pablo Picasso introduced the element of time, the fourth dimen- sion, into his artwork. He
looked at still objects and still figures from all sides and angles and then reassembled his
memories of those views into one image. His work marked the beginning of the modern
movement called cubism.
In 1910, Wassily Kandinsky, a Polish artist, began to paint in a completely different way-in
an abstract style, which made no attempt to represent any real subject. Kandinsky believed
that the power of the painting was in its elements of line, shape, form, color, space, and
texture.
Kandinsky's abstract art launched modern art movements in the 20th century, including
symbolism, art deco, surrealism, social realism, pop art, op art, conceptual art, and
Internet art.
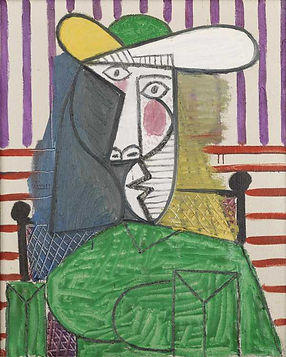
In the style of Pablo Picasso, some modern artists express their art in the form of cubism.
ELEMENTS OF ART AND DESIGN
When you create art, you are expressing your ideas, your feel ings, or your beliefs. If you intend to share your art with other people, you need to know how to organize your design so that they will understand what your art is telling them. If you understand what the elements are and how to use them and apply the principles of design to your composition, you will encourage the viewer to spend time with you through your art.
ELEMENTS OF ART
The elements of art-line, value, shape, form, space, color, and texture-are the basic visual symbols for communicating with the viewer.
Line
As an element of art, a line is a continuous mark made on the drawing or painting sur- face. Although lines vary in length, width, texture, direction, and degree of curve, they are measured by length and are considered to be one-dimensional, There are five kinds of lines: vertical, horizontal, diagonal, curved, and zigzag.
Lines outline shapes, divide space, connect shapes, and indicate movement and direction. Some lines are so wide that they look like shapes. Some lines are drawn so close to other lines that together they create a texture.
Certain lines are imagined rather than seen. For example, when you look after dark at the traffic on a highway, you see a series of white headlights or red taillights. You know these dots of lights come from separate cars, but in your mind you connect the dots to form white or red lines. These lines-called implied lines are suggested, not real. Other examples of implied lines include a trail of footprints in wet sand, the edges of colored objects, and the contrast between light and shadow.
Lines also express moods. For example, horizontal lines express calm or inactivity; diagonal lines express tension or instability.
Artists use lines as actual marks to draw the pictures. They also use lines-implied and real-as part of the whole experience of looking at a painting. Artists arrange lines in the composition to direct the viewer's eye to different places in the picture, to create a sense of rhythm, and to express a mood. As an element of art, a line is about technique as well as composition.


Value
Value is concerned with lightness or darkness. It depends on how much light a surface reflects. Using values with shading tech- niques creates the illusion of three-dimensionality. Artists use the contrast between light and dark values as a design element.
Shape and Form
A shape is the outline or external surface of a form. It is two- dimensional, measured by length and width. A shape is flat and may be drawn as an outline or as a filled-in area. Shapes are either geometric or free-form (irregular and uneven, often found in nature).
A form is a solid, three-dimensional shape measured by length, width, and depth. There are six basic geometric forms: cube, sphere, cone, cylinder, pyramid, and prism.
Artists use geometric shapes and forms as the basis for drawing objects as well as human and animal figures. They also use shapes and forms-geometric and free-form-as design elements to express motion and rhythm in the painting and to control the direction of the viewer's eye movements around the canvas.


.jpg)
Space
In art, space is defined as positive and negative. Positive spaces are the shapes and forms in a drawing or painting. Negative spaces are the empty areas surrounding the shapes and forms.
Artists use the size and shape of negative spaces to describe the positive spaces. For example, a large negative space around a single human form may indicate a sense of isolation or loneliness. Positive spaces in close proximity with slivers of negative space might suggest a feeling of togetherness or crowding.
Color
When white light passes through a prism, the colored light rays bend and project a band of all the colors-the visible spectrum. The colors of the spectrum always appear in the same order: red, orange, yellow, green, blue, and violet. The color wheel is the spectrum bent into a circle. Artists refer to a color wheel to understand how colors mix, contrast, and harmonize with one another. Color has three properties: hue, value, and intersity.
Hue is the name of a spectral color. The primary hues are red, blue, and yellow. You cannot make a primary hue by mixing other hues together, but mixing two primary hues together produces the secondary hues: red and yellow make orange; blue and yellow make green; red and blue make violet. Mixing a primary hue with its adjacent secondary hue produces a tertiary hue: for example, red and orange make red-orange.
Value refers to the relative lightness or darkness of a color. White is the highest value and black is the lowest. All other colors fall between them. The more light a color reflects, the lighter it looks. You can change the value of a hue by adding black or white. A light value of a hue is called a tint, a dark value is called a shade.
Intensity is the brightness or dullness of color. A pure color is the brightest. The more neutral a color becomes, the less intense the color. You can neutralize a color by adding black, by adding white, or by adding the color's complement (its opposite on the color wheel).


Texture
Texture refers to what a surface feels like. The actual drawing surface may feel smooth or rough, depending on the materials used and the amount of medium applied. Texture also refers to what the surface of an object appears to feel like. Some artists who excel at drawing can make you think you can feel a satin skirt, or a lace collar, or a velvet curtain in their paintings.
POINTILLISM
Like the impressionists, Georges Seurat (1859-1891) was con- cerned with reproducing optical color-the color that people actually perceive when they look at something. He devel- oped his own systematic paint- ing technique-called pointillism because of the small points of pure color he painted next to each other. Seurat's method is called optical mixing because the separate points or dots blend in the eye to make colors, not on the painter's palette.
Georges Seurat created a painting style called pointillism, in which separate dots "blend" together to form an image.


PRINCIPLES OF DESIGN
Just as you learn grammar to organize words and communicate in spoken and written languages, you learn the principles of design to organize the elements of art to communicate effectively in a visual language. These principles are guidelines-not rules-to help you express yourself artistically. Understanding these principles also will help you to appreciate how other artists try to communicate through their work. The six principles of design are rhythm, balance, proportion, variety, emphasis, and unity.
Rhythm
Rhythm indicates movement by the repetition of a certain art element or combination of elements. The
repeated element- a shape or line, for example-is called a motif. The artist uses the repetition of a motif
to lead the viewer's eye around the work of art.
Random rhythm happens when a motif is repeated in no apparent order, with irregular spacing
between one motif and the next. Regular rhythm occurs when identical motifs with identical spacing between them are repeated. This steady rhythm may become monotonous to the viewer if not relieved by a change in elements such as shape or color.
Balance
Balance is the visual stability of the composition. If a work of art has visual balance, then the viewer
feels that the ele- men's have been arranged just right. If there is an imbalance, then the viewer
feels something's wrong-that the elements need to be rearranged. A formal balance occurs when
similar elements are placed on each side of the central axis (a drawn or imaginary line through the
center of the work). When both sides of a composition are mirror images of each other, this formal
arrangement is called symmetry.
"Pair of Cranes in the Shadow of Flowers" (c. 1715) by Lang Shih-ning shows an informal, or asymmetrical,
balance with unlike objects arranged with equal visual weight. The different elements of art-line, value, shape,
space, color, and texture-all influence the visual weight of a composition. For example, a small area of bright color can balance a larger area of dull color.
Proportion
Proportion refers to the proper size relationship of one part of the composition to another, and
to the whole work of art. The size of the object itself has no meaning unless you can compare it
to something else.
The proportions of a human figure are not defined in terms of inches, but in ratios of one body
part to another. To determine the proportions of an individual figure, measure the length of the
head from the chin to the top of the skill. The average adult is adult is seven and one-half heads
tall. A young child is five or six heads tall, and a baby is only about three heads long.
Artists use correct proportions to show people or objects in a realistic way.
But some artists, like the expressionists, distort or exaggerated proportions to communicate
feelings such as horror or depression or utter joy.
Scale refers to the size of an object in relation to a standard reference-usually the human body.
If you look at a painting of what seems to be a mountain-without a building, tree, or human figure in the picture, how do you know how big the mountain really is?
Variety
Variety is concerned with difference or contrast. A composition has variety when something
different is added to the design to keep the repetition from being monotonous. Suppose
you had painted red polka dots of equal size, spacing them regularly all over the canvas.
That would be boring, right?
But if you changed just one of those dots from red to green, that different one would grab your attention. Contrast creates variety, too. Different elements placed next to each other (smooth and rough textures, fine and bold lines, free- form and geometric shapes, dark and light values) are in contrast to one another.
Emphasis
Emphasis makes one part of the composition dominant, or more important than the other parts. One specific element- such as color, form, or texture-dominates the whole work. Or, one area of the composition dominates all the other areas. Those elements or areas that are not dominant are called subordinate, or less important. Emphasis controls the order in which a viewer looks at the work and how much attention the viewer gives to each element or area. If the emphasis is on a certain area of the work, that dominant area becomes the focal point, or the first place the viewer looks.


POSITIONING YOUR FOCAL POINTS
One way to create a strong composition that will attract and hold the viewer's attention is to draw a grid to locate focal points of interest. Divide the field of vision into thirds, vertically and horizontally. The lines intersect in four places, all good focal points. In this painting, notice how the boy's eyes are looking at the violin bow. This detail adds emphasis to the composition. The four places where the lines intersect are all good focal points. In this composition, the artist used one focal point.


Unity
Unity is the quality of being complete-when the separate elements serve the whole and nothing seems out of place or added unnecessarily. To create visual unity in a composition, the artist relies on design principles to arrange the elements of art so they work together.
As you plan your projects to meet the requirements for the Art merit badge and look at works created by other artists, think about what seems right about the compositions. Identify the specific art elements the artist chose and which design principles apply. When you understand how the artist created visual unity in the composition, you will discover that you actually appreciate the artwork more. You might even realize that now you like a painting or style that you didn't think you liked before!
ART MEDIA & TECHNIQUES
The visual artist can choose from a variety of media, or materials, to create a drawing or painting. Each medium has qualities that make it better for certain applications than others. Try to learn what these qualities are so you can pick the right medium for each of your renderings.
FUNDAMENTALS OF DRAWING
Drawing is the basis for painting, sculpture, and printmaking. Of course, it's also the basis for drawings-graphic images usually created with pencil, pen and ink, and charcoal in black and white tonalities.
A drawing takes three forms:
-
Sketch - a quick impression drawn with loose lines suggest- ing something seen or imagined
-
Study - a preliminary drawing in which the artist works out problems for a more involved work
-
Drawing - a composition that is a finished artistic statement with visual unity
Drawing Media and Materials
In addition to the actual drawing media, you will need other materials to create a drawing. Before you make
your first mark, set up your work area with the right supplies.
-
Paper. Both handmade and commercially made papers come in different weights, textures, and degrees of absorbency. Hot-pressed papers and illustration boards have hard, smooth surfaces-just right for making sharp lines. Cold-pressed papers and boards have a textured surface, which absorbs paint well. Choose the right paper for the medium so you will be pleased with the results. If you want your work to last, use acid-free paper so it won't change color over time. Before you're ready to seal a drawing, you should protect it with a sheet of tracing paper to keep it from smudging.
-
Drawing surface. The correct position for a drawing surface is at 45-degree angle so that the artist can draw figures and objects in the correct perspective. Professional artists work at a special desk with a surface that can be tilted. You can use a drawing board or clipboard, just be sure to hold it at a 45-degree angle.
-
Erasers. A kneaded eraser can be manipulated into flat shapes, points, or edges, and is meant to be pressed down on drawn marks, then lifted to remove the graphite or charcoal medium. A white eraser with a slightly gritty texture is good for rubbing a mark off the surface without leaving color on the paper as a pink eraser would do.
-
Sharpeners. You'll need a pencil sharpener to keep a fine point on graphite, charcoal, and pencils. With a craft knife, you can sharpen corners and edges on a charcoal or pastel stick or shave it to make a powder.
-
Blending tools. A tortillon and blending stump are pointed cylinders made of tightly rolled paper. They are used to blend and spread the media. You can also use cotton balls and chamois cloths for blending.
-
Spray fixative. To prevent your finished pencil, charcoal, or pastel drawing from smudging, you'll need to seal it with a fixative. Hold the aerosol can about a foot from the drawing. Spray across the drawing, not straight down on it, and keep the can moving.
-
Fixative fumes are toxic and flammable. If possible, spray your work outdoors. If you "fix" your drawing indoors, wear a dust mask in a well-ventilated room.
PENCIL
The simplest and most available drawing media is the pencil. With a
graphite, or "lead," pencil, you can create a monochre- matic drawing
showing complicated details and lighting. The quality of the graphite is
rated in a hardness range from the hardest, 9H, to the softest, 6B. You
produce the darkest value with the softest pencil. Most artists use 6B
and 2HB pencils, available at art supply stores. However, you can draw
with the basic No. 2 pencil that is commonly used at school. Keep your
pencil sharpened to a fine point. Just remember: The softer the "lead," the sooner the point is blunted.
You can adjust the quality of the marks you make by varying the pressure of your hand movements. Press lightly on the paper with a sharp point to make thin lines; press hard with a blunt point to make bold, broad lines. The pencil drawing works best on paper with a dull textured surface. For sketches and studies you don't intend to keep a long time, you can draw on a pad of newsprint. Clean up smears and unwanted lines with a kneaded eraser.
Unlike graphite pencils, colored pencils have a waxy nature so you cannot blend their colors. Instead, you build up layers of crosshatched colors to create the visual effect of blended color. Refer to the "Drawing Techniques" section to learn more about cross-hatching.

PEN AND INK
Artists have been drawing with pen and ink for centuries, but they used to draw with quills, reeds, and bamboo. You can still draw with them today, but you can also choose special pens to suit your style. You'll have to experiment with different pens to find out which ones you prefer.
Pens that come with self-contained ink include fountain, rollerball, felt-tipped, and technical pens. These are available in different tip sizes to draw fine, medium, and bold lines. With these pens, you get a steady flow of ink and a consis- tency of lines.
A dip pen comes with a nib holder and different widths of nibs, or tips. You can vary the thickness of lines according to the amount of pressure you exert on the nib. The ink for this kind of pen comes in a bottle. The most common ink colors for drawing are black and shades of brown. Inks are waterproof or nonwaterproof. Most nenwaterproof inks will fade gradually if exposed to light.
Use a heavyweight paper or illustration board with a smooth surface. If you draw with a dip pen, wipe your pen carefully on the bottle each time you dip into the ink so you don't spill or blob ink on your paper.
CHARCOAL
Charcoal sticks and pencils contain an impure form of carbon, made by burning sticks of wood with little oxygen. The char coal is compressed to varying degrees of softness. Many artists enjoy using charcoal because they can draw quickly and can make corrections without ruining the paper.
Use the corners of charcoal sticks to make fine lines, or lay the stick flat to make broad strokes. You can easily manipulate charcoal, blending it with a paper stump, a cotton ball, or even your fingers. With a kneaded eraser, you can lift charcoal off the paper to create a lighter tone. Experiment with the medium by applying different amounts of pressure to the charcoal stick on a variety of smooth and rough papers.
Artists often use charcoal to make a preliminary sketch and then draw or paint over it with another medium. If you intend to frame or keep your charcoal drawing, be sure to spray it with a fixative.
DRAWING TECHNIQUES
Drawing is a skill you can learn with practice. And more practice. And more practice. But be assured-you will improve. Observe,
analyze, read. And keep drawing!
DISCOVERING BASIC CHARACTERISTICS
You can observe your subject to discover its basic characteristics. Or you can draw it. Contour lines define the edges of an object. The outlined object appears as a flat two-dimensional shape. But contour lines also follow the volume of the object, revealing its three-dimensional form.
A gesture drawing of a person or animal captures a pose or sense of movement. Unlike contour drawings, gesture drawings have no outlines or details. These quick sketches-built up with scribbles and broad fill-in strokes-reveal the bulk of the figures.
You can't erase mistakes in pen-and-ink drawing, so here are a few tips to prevent unwanted marks:
-
If you're right-handed, start working on the left side of your drawing. Start on the right side if you're left-handed.
-
After working on one area, turn your paper around to work in a new area so you won't smudge the wet ink.
-
Place a piece of paper under your drawing hand, but keep it still while you draw.


CREATING THE ILLUSION OF FORM
Modeling uses light and dark values as a way to suggest the three-dimensional qualities of a drawn object. It involves the following basic shading techniques:
-
Solid shading - blending or smudging pencil, charcoal, or pastel marks with a stump, cotton ball, rag, or fingers
-
Hatching - shading with a series of fine parallel lines drawn close together for a dark value or loosely for a lighter one
-
Cross-hatching - hatching with two or more intersecting sets of parallel lines
-
Stippling - shading with dots instead of lines
CREATING THE ILLUSION OF DEPTH
If you want to draw convincingly, you must learn to observe correctly so your eyes don't fool you. Otherwise, your drawn buildings might appear to lean or the forms in your still life might seem ready to slide off the table. Artists use a system called perspective to correctly draw the interrelationships of objects in space. Perspective is a way of showing the illusion of depth on a two-dimensional surface. The controlling elements are:
-
Eye level - What you see depends on your position when you are looking at the subject. You may look straight, down, or up at the subject.
-
Vanishing point - A specific point on the horizon line where parallel lines seem to meet.
In one-point linear perspective, the front of the subject is parallel to the picture plane. All receding parallel lines seem to meet, or converge, at one vanishing point on the horizon.
One-point perspective


Artist's tip: An easy way to maintain accurate proportions for all the images in your picture is to use your pencil as a gauge. Hold the pencil at arm's length and align it with an object in your composition. With one eye closed, measure the image exactly as you see it from the tip of the pencil to your thumb. Transfer that measurement to your paper to draw the image in iden- tical size. You can use this method for portraits, still lifes, and landscapes.
FUNDAMENTALS OF PAINTING
Artists use line and color in different ways to make paintings. In some artwork, the line drawing is the basis for the painting and color is a secondary element, added to describe the out- lined forms. In other works, color is the subject of the painting. No matter how you plan to use color, you need to know how to mix pigments and apply the paint.
Painting Media and Materials
Paint is formed when a pigment is mixed with a binding medium. Pigment is finely ground, colored powder that comes from natural sources like minerals and plants or from chemicals. Binding medium is a liquid substance that holds pigment parti- cles together and attaches them to a surface. This substance is also called a vehicle because it "carries" the pigment.
In addition to paint, you'll need other materials and sup- plies. These will depend on which paint medium you plan to use: pastel, watercolor, tempera, acrylic, or oil.
-
Easel
-
Painting surfaces such as paper, hardboard, or primed canvas
-
Mediums to thin or thicken acrylic paint
-
Linseed oil and turpentine for oil paints
-
Painting tools: sable or synthetic brushes, natural sponges, foam rollers
-
Blending tools: tortillon and blending stump, chamois
-
Palette
-
Palette knife
-
Rags
-
Spray fixatives
-
Water
PASTELS
Pastel is basically chalk mixed with pigment and a binding medium. It is considered to be both a drawing and a painting medium because it can be applied dry with a chalk stick or pencil, or spread with a wet brush.
The pastel types are:
-
Soft pastel. The chalk stick-the most popular form-comes in bright colors. It smudges, so it is easy to apply in broad strokes and to blend. The chalk particles are like dust, so use soft pastels on paper with a rough texture. You'll have to spray a fixative to help the chalk dust stick. Soft pastels are water- soluble, so they can be applied like watercolors.
-
Pastel pencil. The pencil is a harder version of the chalk stick. It doesn't smudge, so you can use it to draw lines and fine details.
-
Oil pastel. This pastel is soluble in turpentine. It acts more like oil paint. Its biggest advantage is that it is dustless and doesn't require a fixative. The oil pastel is best for bold, pure color. Because the oil pastel goes on like a paste, the artist can use it on smooth paper.
Here are three ways to start a picture with pastel:
-
Linear - Draw the whole composition as a line drawing in one color with a pastel pencil. Then fill in color
with soft pastel sticks. -
Block-in - Block in the whole composition with masses of color, using the broad side of a soft pastel
stick. Add lines, if you wish, for detail and fcr emphasis. -
Crosshatch - Make a crosshatched drawing of the composition using pastel pencils in various colors.
Then spray a workable fixative over the layer. Apply color with soft pastel sticks.
The key to a great pastel picture is working in layers to add and blend colors. With soft pastels, the chalk dust
builds up in the grooves of the rough paper. If too much chalk builds up, the color will look muddy. To avoid
that, spray a fixative over the picture between layers of color. The fixative will darken the colors slightly, so apply
each layer of color with a light touch.
WATERCOLORS
Watercolor paints come in tubes or hard blocks, called pans. The tubes keep the paint from drying out, but the pans are convenient, too, because they can be stored in metal watercolor boxes.
You'll need two or three soft sable brushes in different sizes to make fine tapered lines and broad brush marks. The sable brushes cost a little more than synthetic brushes or the camel's hair brushes in children's watercolor sets, but they are worth the money because the sable brushes give you a lot of control and keep their shape longer.
Clean your brushes after every use with mild soap and water. Make sure that you wash out the paint that collects in the heel of the brush (next to the metal ferrule). With your fingers, reshape the bristles to a point, and lay the brushes on a flat surface to dry. When the bristles are completely dry, store the brushes-point up-in a jar.
Watercolors are transparent when mixed with water. They reflect light, producing a delicate effect. You can blend colors together directly or layer colors in watery washes for soft shifts in light and dark values. Try the wet-on-wet technique by damp- ening the page first with a wet sponge. Then let the watercolors flow from your brush onto the paper. The wetter the paper is when you make your strokes, the more the colors will spread and soften. For the wet-on-dry technique, let your first layer of wash or brushstrokes dry. Then add more paint. The brush- strokes you apply over the dry layer will keep their sharp edges. Tints will become lighter as they dry, so allow for this by painting a little darker than you want your final picture to look.
TEMPERA
Tempera paint is poster paint, the kind of jar paint you probably have used many times in school. Like watercolor, tempera paint is soluble in water, but the paint is not as transparent. Also, tempera paints offer brighter, stronger colors and do not dry quite as fast as watercolor.
If you have not used tempera much before, experiment with it a few times before you start the painting for this requirement. You can thin the consistency of tempera by adding water, or you can use it thick. For interesting effects, apply both consis- tencies with medium and large brushes. Use what you learned about mixing colors. Try painting a sky, a mountain, or even a face with many colors applied with many brushstrokes. Your subjects will look like forms rather than solid shapes.
Start by sketching your subject lightly in pencil. When you're ready to paint, use flat bristle brushes to apply broad washes of color first. Then use round or flat sable brushes to outline shapes and fill in details.
As with other media, you'll reed to practice a lot before you're able to achieve all the tones you want.
ACRYLICS
Acrylic paint, made with a synthetic resin binder, has been available to artists for only the past 50 years. It is the most versatile of all painting media:
Once dry, the plastic paint is almost indestructible. Acrylics are unaffected by extremes in the weather.
-
Colors are brilliant and easy to mix.
-
Acrylics can be used on almost any surface-except on those containing oil or wax. Do not use on canvasses primed for oil paint. If you want to paint on a very shiny or very smooth surface like metal or glass, roughen the surface a little with sandpaper so the paint will adhere.
-
Acrylics act like oil paints but dry almost immediately, so you can make a painting in a day instead of weeks or months.
-
Cleanup requires water, not toxic chemicals like turpentine or paint thinner.
Any brushes that could be used for watercolor or oil can be used with acrylic paint, but make sure to clean all traces of oil and turpentine on old brushes because those substances will react badly with acrylic paint.
Experiment with the following techniques to explore some of the
many ways to use acrylics:
-
Opaque technique. For maximum color coverage, use undiluted acrylic
paint. On their own, acrylics tend to dry to a dull finish. To achieve a soft, shiny
finish, you can mix an acrylic gloss medium with the wet paint before you apply
it. By doing so, you make the acrylic paint more fluid and easier to brush on. The
more water you add to the medium, the less glossy your picture will be. The
acrylic medium dries clear and allows you to see colors painted underneath
others. -
Transparent technique. Mix a glazing medium with acrylic paint to apply
the paint like watercolors. Unlike watercolors, however, acrylic colors remain separate and are water-insoluble once dry, so you can build layers of transparent color without the colors dissolving into others or becoming muddy. -
Texturing technique. You car increase the volume and thickness of acrylic paint by mixing it with a gel medium or modeling paste. Apply the paint with a brush or painting knife. If you want a heavy impastoed surface, build texture in layers. While the paint is still wet, you can scratch the surface, press crumpled foil into the paint, or dab it with a stiff brush. Experiment to invent your own texture.
-
Collage. Acrylic paints and acrylic mediums are adhesive, so they are ideal for combining materials into one picture. Any materials stuck to or pressed into acrylics will stay permanently in place when the paint dries.
The advantages of acrylic - it dries quickly and is permanent-can turn into disadvantages for you if you don't plan your painting first. Draw your painting on the surface before you apply paint. Experiment on practice projects before you start your painting for this requirement.
OIL PAINTS
For hundreds of years, artists have painted with oil-based paints. Because the paint dries slowly, the artist can make changes to the composition, modify color relationships, and achieve different effects by applying the paint thickly in impasto, or thinly in glazes.
Paint "fat over lean" is the basic principle of traditional oil painting. "Fat" oil paint has more oil medium (linseed oil) in it; "lean" oil paint has less oil medium in it. The more oil medium in the paint, the more flexible it is. As artists apply successive layers of oil paint, they add more oil medium to the paint to make it fatter and more flexible. This fat-over-lean rule ensures that the upper layers don't dry faster than the lower ones, which can cause the paint to crack as it dries.
There are two methods of oil painting-direct and indirect.
-
Direct method - The oil paint is applied in one layer. With this method, you can complete a painting in one session because there is no waiting time required before adding another layer. Colors (hues) mixed directly on the palette or on the canvas have solid, concealing coverage.
-
Indirect method - With this more traditional approach, you apply oil paint in layers, gradually adjusting the opacity (concealing coverage) and transparency of the colors to create different effects.
The first step in the indirect method is underpainting, which is basically a brush drawing in one or two colors. This first layer of paint establishes the basic composition. Paint the lines in the underpainting stronger than you intend them to be in the final stage because subsequent glazing will soften them. In the next step or steps, apply glazes to layer color. You can paint opaque color directly painted into the wet glaze or when the layer dries.
When the painting is complete, allow it to dry completely in a dust-free area. Don't let it dry in the dark because the lack of light may cause a thin film of oil to rise to the surface and yellow the picture. It may take six months to a year for an oil painting to dry thoroughly. When you are certain the paint is dry, protect your painting with a coat of varnish.
Clean paintbrushes thoroughly with turpentine and rags. Then rub the bristles in a jar filled with brush conditioner or human hair shampoo. Then rinse thoroughly and squeeze out the water. Store the brush with bristles up.
Be sure you have the right tools and materials before you start painting.


COMPUTER DRAWING AND PAINTING
If you make art with your computer, you won't get your hands dirty, you won't have to wear a mask to
keep from inhaling toxic fixative fumes, and you won't have to clean your tools when you're done. But
you will have fun!
You need a computer with software that includes at the very least-some drawing tool But to really learn
how to create computer art, you'll need a drawing and/or painting program You'll also need a desktop printer.
Other computer drawing tools can be useful:
-
A scanner will help bring photographs, printed images, and your own rough sketches into the computer.
-
A digitalizing tablet and stylus (pen) is an input device, similar to a mouse. When you move the stylus over the tablet, the cursor on the screen moves. The flat drawing surface is pressure-sensitive, so it reacts to the amount of pressure you apply with the stylus. The harder you press, the thicker the electronic "paint" will flow on the computer screen. Many artists like to use the digitizing tablet because it makes drawing and painting on a computer feel more natural.
COMPUTER GRAPHIC IMAGES
Graphic images are stored on the computer as bitmapped images or vector images. A bitmapped image is made of tiny square cells of color called pixels, which are arranged in neat rows and columns like a grid. The grid is called a raster, so bitmapped images are often called raster images. Each pixel is independent of the others and contains one color (like a mosaic tile).
A vector image (sometimes called an object-oriented image) is stored in the computer as a set of mathematically defined objects, or shapes. One advantage of a vector image over a bitmapped image is that it can be scaled (changed in size) without losing its appearance.
Computer Drawing Programs
Drawing and illustration programs are vector-based applica- tions. They were originally developed for mechanical drawing and technical illustration because they produce such clean lines and hard-edged images. Vector images appear solid and flat, more like two-dimensional shapes. Artists often use vector-based drawing programs to design logos and graphics composed of individual objects or shapes.
To draw a vector image, start by creating a path that defines the boundaries of the object. Each click of the mouse sets set down anchor points, which are the path segments. To control a curved path, use the direction lines and their control points. When the outline is complete, add color to make the shape.
A drawing program creates independent objects that can be placed on top or underneath each other, moved apart, scaled one or more to different sizes, or reshaped. In contrast, a paint- ing program creates separate objects, but they are not independent.
To reshape an image, drag a control point at the end of the direction line, or drag an anchor point on the curved path.
Computer Painting Programs
Painting programs are based on bitmapped images. The digital toolbox contains electronic paintbrushes, which can be used to imitate the effects of natural paint media. The variety of painting tools allows you to add color and adjust light and dark values, change intensity, and add texture. A computer- painting program allows the user to paint realistic images on an electronic canvas.
A special feature of these programs is layers. These are like stackable canvasses, each holding part of the ultimate image. It is possible to work with each layer independently or to work with groups of layers. When the combination of stacked images is complete, the layers can be flattened into a single image, and a blending tool can be used to blend edges into one seamless image.
Computer Graphic Images
Instead of creating original art from scratch on the computer, mos: artists start with a scanned image. A rough sketch or study can be made with a real pencil then scanned into the drawing or painting program. Digital painting tools then can draw over the scanned sketch.


VISUAL STORYTELLING
Prehistoric artists were storytellers first, artists second. Their paintings and carvings on the walls of caves and cliffs are the only clues we have about how they saw the world.
Today's artists draw and paint pictures to tell stories about how they see the world, too. In 1973, Norman Rockwell-regarded by many as one of America's finest artists-painted the picture called "From Concord to Tranquility." His painting depicts the American Revolution at Concord, Massachusetts, and the modern-day revolution of space-age technology represented by astronaut Neil Armstrong in his space suit. Notice how Rockwell has organized this painting. Everyone is facing the same direction and saluting the American flag. What kind of mood does this painting express? What do you think the artist is telling you about his world? How does this painting affect you?
Regardless of whether you paint in a realistic style like Rockwell or an abstract style in which nothing looks real, your picture must have three parts:
-
Subject - people, objects, and landscapes
-
Content - the story, expressed as mood and message
-
Composition - the ordered arrangement of the elements of art to reinforce the content
TELLING A 2-D STORY
You have the option of telling a story with one or more pictures. If you choose to draw a comic strip, be sure the pictures tell the story. Don't just illustrate a joke, and be careful not to let the words in the balloons over the characters' heads tell the whole story. Use only the words that help explain the action or emo- tions that the drawings show.
You are not limited by any format or medium. If you choose to illustrate a picture bock, a comic strip, or a series of related paintings, go right ahead.
This diorama is an example of a 3D rendering. If you make your own diorama, you'll create
something based on the story you want to tell. For this kind of project, you will need some
basic materials: a shoebox (or something similar), glue or tape, paint media, paper, and
scissors. Gather other materials around your house or from nature as needed.
TELLING A 3-D STORY
If you would prefer to tell a story in a three-dimensional format instead of creating a picture, you can do so in any way you choose. You could make a mixed-media collage, mobile, sculpture, quilt, or whatever you can dream up.

What is it that you want to express in your artistic story? Are you grateful for something? Angry about a situation? Anxious about leaving your dog home alone? What about drawing a picture of your dog waiting at your bedroom window with one of your caps in her mouth? You could show your school bus on the street below your window. Those images and that setting describe a story and express a mood. The viewer doesn't know the actual ending of the story, but fills it in from his or her own imagination. Because the picture makes a total impression and acts on the viewer, the story is complete.
Once you know what your mood or message is, you decide what your subject: will be-perhaps a group of kids shooting hoops, or a still life of your messy desk, or a campsite by the lake. Now you have to consider how to organize all the elements-lines, values, shapes and forms, space, color, and texture-to reinforce the mood or message. Apply the principles of design, too. But don't get overwhelmed. Just use what works to communicate your story.
Make a viewfinder to help you frame your story!
MATERIALS NEEDED
-
Cardboard
-
Scissors or Utility Knife
-
Pencil
-
Paper
PROCEDURE
-
Cut two pieces of cardboard into L shapes according to the dimensions in the illustration.
-
Hold the cardboard strips in front of you and adjust the two L-shapes to make frames of different sizes and shapes around a scene you want to draw. You might even get an idea for a picture by moving the frames around a room or outdoors.
-
When you frame a view that pleases you, make a quick pencil sketch of the cropped view so you can begin your composition.


FUNCTIONAL ART & DESIGN
Many people think art is beautiful and decorative and meant to be displayed on a wall or a tabletop. But they don't realize how many everyday objects are art, too-created to be useful. Walk through a home improvement store and look at all the different sink faucets for sale. And doorknobs. And riding lawn mowers. All those products have been created by designers-people trained to make art for practical purposes.
DESIGN FOR USE
For requirement 5, you have an opportunity to design something useful and beautiful. Have you ever been frustrated when you were trying to do something and wondered why no one has invented something to make your task easier? Well, now is your chance to design something that makes life easier or safer or better smelling.
Let's say you design a beautiful car that gets great gas mileage because of its low profile. Sounds like a great vehicle for an elderly person on a fixed income-except that the car is too low for that person to get in or out. If you rede- sign the car to suit an elderly person, it will be too high to get good mileage. Maybe you could keep the low profile, but jazz up the design to appeal to a young person who wants a sleek looking, economi- cal car. Because you have designed the car with the end user in mind, you also know whom you are going to target in your promotional piece. You want peo- ple who drive to find out about your car, so you create an ad for a billboard along a major highway. But you design the ad to attract young people who want to drive a cool car and save money on gas so they can spend more on clothes and entertainment.
Start thinking about how your design will be used. Begn the design process by sketching ideas and mak- ing notes. Draw thumbnail sketches of your design from different angles and show ways it might be used. Who is going to use it? Do you see any design prob- lems that need reworking? If so, change the design. Make the final detailed drawing or model. Then create a promotional piece to attract people to your design. Your promotional piece can be as simple as an announcement, flier, or poster, or it can be more com- plicated like a folded mailing piece. Just use your imagination and the information you have learned about what makes good design.
From a sketch to the finished product, designing a functional piece of art lets you use your imagination and talent.
DESIGN FOR IDENTITY
A logo is an identifying symbol designed to make people recognize a company or product every time
they see it. The Boy Scouts of America logo is recognized nationwide.
For requirement 5, you may design a logo. It can be a logo for a company, a product, a team or other
organization, or a service. Designers spend a lot of time trying to determine what is unique about a
company or a product, and they use that information to create a message that sets the company or product
apart from its competition. Then they translate the written message into a logo to use on everything that the customer sees.
When you look at the BSA logo, what do you think? Do you know why the designer combined a fleur-de-lis, eagle, shield, and two five-pointed stars?
For your logo design, start by sketching ideas. Choose design elements that communicate the message. Be prepared to explain the significance of those elements to your counselor. Finalize the drawings with full color and details. After you have designed your logo, you must apply it to Scout equipment, furniture, ceramics, or fabric. How you go about this depends mainly on what the article is.
If it is a piece of furniture, you could simply trace the design where you want to apply it and then paint the logo on the traced design. If you want to put your logo on a patrol flag, you could trace it onto a piece of cloth of the proper color, cut it out, and sew it onto the flag. You could use the screen-printing process to apply your logo to fabric.

ART SHOWS & SPACES
Looking at a piece of art in a book or on the Internet is like looking at a travel brochure. You can't really appreciate the art or the exotic island until you see it in person. That's why you must visit a museum, art gallery, or special art exhibit to experience the art. You might be surprised to find out that a portrait you'd seen in an art book and thought was about 3 feet high is actually more than 7 feet high. Or that a painting you viewed on your computer monitor looked like a huge brown square actually has many layered colors that seem to blend into a solid color.
At a museum-or, perhaps, at a gallery or spec al exhibit-
you'll have a chance to see art created by many artists.
You can com- pare the ways they used the elements of
art and applied the principles of design to different
compositions. Is there a specific painting you like the
most, or a particu- lar style you prefer?
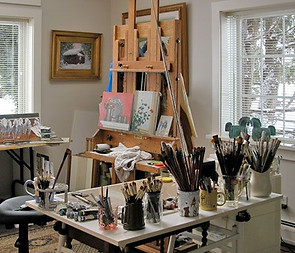
Try to arrange a visit to an artist's studio. Talk to the
artist, if possible, about the work and the media and tools used. Find out how the artist solved design problems. Think about how you might apply what you've learned to your own artwork.
